")
In order to intuit new concepts, one must first remove the abstraction it is automatically plagued with. For me, the concepts are aerodynamics and electronics, and the way I have chosen to parse them is the radio-control hobby. This series will record the steps I took to make a 3-channel RC plane.
Exposition of RC planes
For the reader who may be uninformed in this hobby, the following paragraphs will provide the necessary details.
An RC plane, or radio-controlled plane, is basically a toy. You have a remote, called a transmitter, that you use to control the plane’s speed and orientation. With each manipulation of the transmitter, a signal is sent via radio waves to a receiver that is on the plane (hence the name). This receiver then translates the radio waves into commands for the onboard electronics.
The fundamental electronics of an RC plane are the battery (which powers everything), the motor (which makes it move), the servos (which control the plane’s flaps), the ESC (which regulates the amount of power sent to the motor and servos), and the receiver (which tells all those electronics what to do).
It’s pretty fun.
The beginning of my journey
Despite my best efforts, I failed to find any venture capitalist who would consider my happiness a return on investment. The funds, therefore, had to be provided by me, but my refusal to spend any significant percentage of my wealth necessitated that the project use as little expenditure as possible.
As this blog is simply an account of my extracurricular projects and NOT a tutorial, I feel obligated to say that, if you are interested in making an RC plane, you MUST do your research. This blog is not an authoritative source on how to go about this fun yet potentially dangerous hobby. With that said, I have listed the parts I bought for this project below:
- Transmitter and receiver
- Motor, ESC, servos
- LiPo (lithium polymer) batteries
- Charger for LiPo batteries
- Battery analyzer
- Foam board (I would recommend bigger sheets than these, though)
Per the advice of a Youtube video, I decided that before committing to a plane with quasi-fractal complexity, I would attempt to build a ‘hovercraft’. This method, which I strongly suggest for the beginner, allows one to make all the dumb mistakes on something that has zero probability of falling on someone’s head. It acts as a proof of concept, allowing you to find the proper rudder shape and propeller placement.
Construction of the ‘hovercraft’
Though this is not a tutorial, I will share how I made this craft.
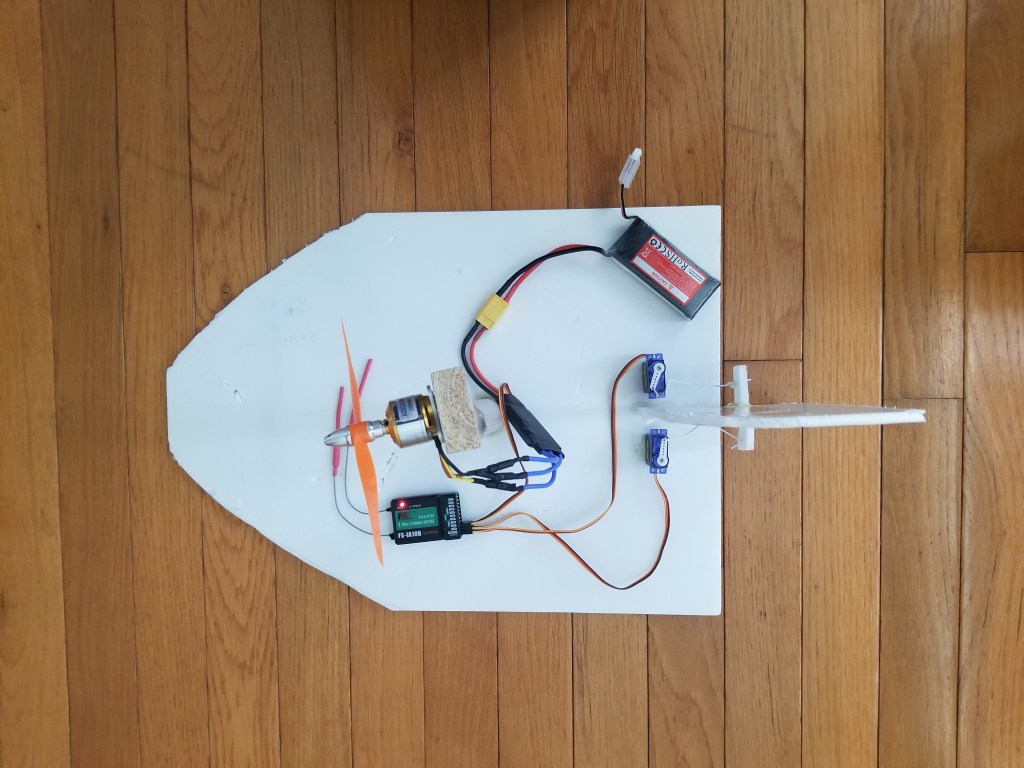
For the body of the craft, I used one board of foam whose front I cut into a more aerodynamic look – for style. I did not use any measurements for the hovercraft, since I had to reverse engineer it from a picture I saw.
For the rudder, I cut a section of the foam board with a box cutter and sliced 45° angles on both sides of a line I drew on it. This would be the hinge from which the rudder pivots. To secure it, I placed packaging tape on the other side of the rudder, lining the hinge. I used little square pieces of foam so that the servo rods (I used paper clips for the rods) can be glued to them and move the rudder. I then hot glued this to the back of the craft.
For the motor mount, I recommend finding a better design. The mount I developed was made of a sawed-off portion of a paper towel roll, with a piece of wood (holding the motor) hot glued to it, and then the whole thing hot glued to the body. Each time I throttled the motor, the entire mount support would lean forward considerably, making me very, very nervous.
The rest was electronics and pretty easy.
The finished hovercraft was beautiful …

at least it was to me.
The first cruise around
The hovercraft, in just a few hours, was positioned on the runway. Its white foam shined radiantly in the afternoon sunlight, impressing my family members who were ready to video the maiden flight. I turned my transmitter on, bent down and connected the battery. It emitted a few beeps, confirming that it’s ready. I walked a few steps back, took a deep breath, and gently increased the throttle …
It moved! Indeed, it glided elegantly across the hardwood floor!
It did so slowly at first and then faster as I put it to its max power. Testing the rudder, I initiated a turn, and the hovercraft obeyed perfectly in step. It glided better while turning, so I had it do circles around the hallway.
After about a minute, I brought it to a halt and joined my family in their amazement.
My first ever RC project was then in the history books, labelled as a “Success!”. The lessons I learned from building this and the research I conducted when looking for parts are a massive stepping stone on my way to overcome the large learning curve of RC planes. It was an amazing experience.
The hovercraft’s demise
After I did a few more flights, gradually figuring out the sensitivity of the controls, my father asked if he could try. Being a good son, I said “certainly” and told him the basics of how to operate it. He then sat down on the shoe bench, took the transmitter, gently increased the throttle … and then he floored it.
The hovercraft raced at immense speed and was clearly on course to hit a box. My father tried to turn the rudder, but (alas!) it was too late. It crashed straight into the box. The propeller sliced everywhere and everything, causing one of the blades to break and fly off in some direction.
I grabbed the transmitter from my frightened father and shut it off – but the damage was done.


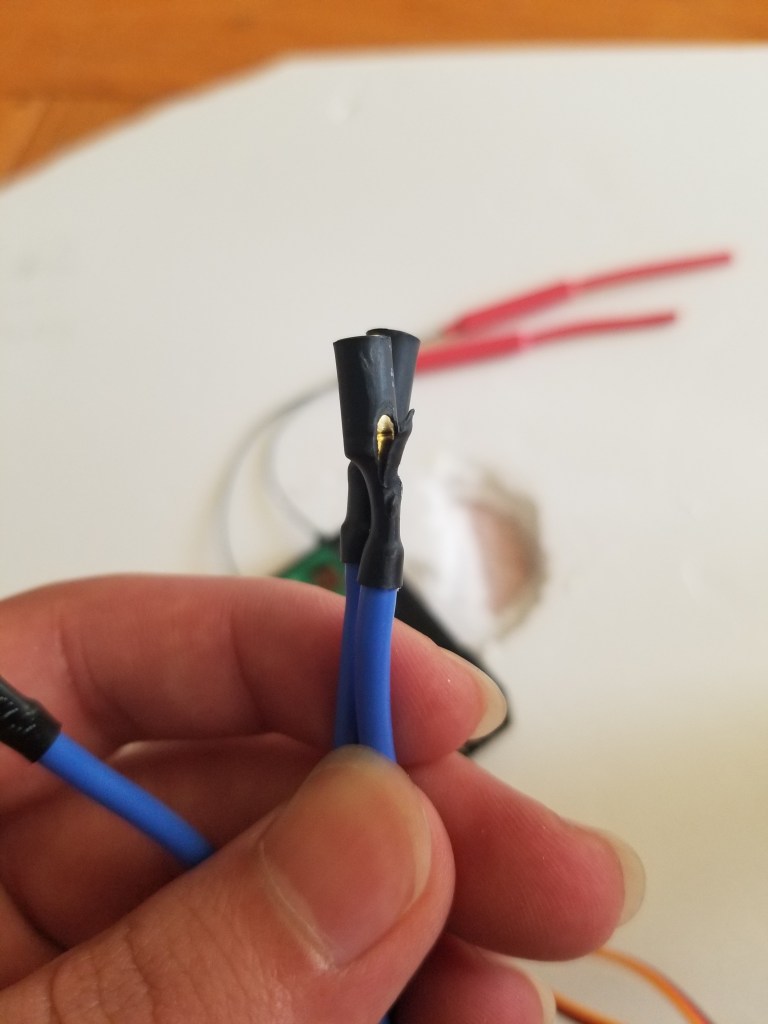
A clipped rudder, a broken propeller, and sliced ESC leads.
Lessons learned
The problems were easily fixed, however. I had an extra prop, and the ESC leads could be fixed with electrical tape. I rebuilt it again, but I wasn’t as careful with the motor alignment, leading to it being crooked. It didn’t glide as well.
I then fixed the alignment, and it worked fine.
Throughout this project, I learned many things, including:
- All the intricacies of LiPo batteries, including capacity, cells, discharge rates, internal resistance, how to prevent one from blowing up, etc. (It took me weeks to comprehend all these things).
- How to make a rudder, which is knowledge that can be applied to all plane control surfaces.
- The functions of all the electronics individually and holistically.
- An intuitive sense of high speed dynamics (from the crash).
- And, importantly, how to pilot such a device.
The hovercraft is now only scrap on my workbench, the electronics to be reused in future projects and the foam body kept as a treasured monument of my first RC adventure (though, I will probably throw it away).
On to the real thing! Ad caelum!
